APPENDIX A
UN-ECE REGULATION NO. 99/00
UNIFORM PROVISIONS CONCERNING THE APPROVAL OF GAS-DISCHARGE LIGHT SOURCES FOR USE IN APPROVED GAS-DISCHARGE LAMP UNITS OF POWER DRIVEN VEHICLES
Regulation No. 99
UNIFORM PROVISIONS CONCERNING THE APPROVAL OF GAS-DISCHARGE LIGHT SOURCES FOR USE IN APPROVED GAS-DISCHARGE LAMP UNITS OF POWER-DRIVEN VEHICLES
CONTENTS
1. Scope
2. Administrative provisions
2.1. Definitions
2.2. Application for approval
2.3. Inscriptions
2.4. Approval
3. Technical requirements
3.1. Definitions
3.2. General specifications
3.3. Manufacture ..
3.4. Tests
3.5. Position and dimensions of electrodes, arc and stripes
3.6. Starting, run-up and hot restrike characteristics
3.7. Electrical characteristics
3.8. Luminous flux
3.9. Colour
3.10. UV-radiation
3.11. Standard gas-discharge light sources
4. Conformity of production
5. Penalties for non-conformity of production
6. Production definitely discontinued
7. Names and addresses of the technical services responsible for conducting approval tests, and of administrative departments
ANNEXES
Annex 1 - Sheets D1S/D2S
Sheets D1R/D2R
Annex 2 - Communication concerning the approval or extension or refusal or withdrawal of approval or production definitely discontinued of a type of gas-discharge light source pursuant to Regulation No. 99 Annex 3 -Example of arrangement of the approval mark
Annex 4 - Method of measurement of electrical and photometric characteristics
Annex 5 - Optical setup for the measurement of the position and form of the arc and of the position of the electrodes
Annex 6 - Minimum requirements for quality control-procedures by the manufacturer
Annex 7 - Sampling and compliance levels for manufacturer test records
Annex 8 - Minimum requirements for sampling by an inspector
Regulation No. 99
UNIFORM PROVISIONS CONCERNING THE APPROVAL OF GAS-DISCHARGE LIGHT SOURCES FOR USE IN APPROVED GAS-DISCHARGE LAMP UNITS OF POWER-DRIVEN VEHICLES
1. SCOPE
This Regulation applies to gas-discharge light sources shown in annex 1 and intended for use in approved gas-discharge lamp units of power-driven vehicles.
2. ADMINISTRATIVE PROVISIONS
2.1. Definitions
2.1.1. The term "category", is used in this Regulation to describe different basic designs of standardized gas-discharge light sources. Each category has a specific designation, as for example: "D2S".
2.1.2. Gas-discharge light sources of different "types" are gas-discharge light sources within the same category which differ in such essential respects as:
2.1.2.1. Trade name or mark;
2.1.2.2. Bulb design, in so far as these differences affect the optical results;
2.1.2.3. Bulb colour. A yellow bulb or an additional yellow outer bulb, solely intended to change the colour but not the other characteristics of a gas-discharge light source emitting white light, does not constitute a change of type of the gas-discharge light source.
2.2. Application for approval
2.2.1. Application for approval shall be submitted by the owner of the trade name or mark, or by his duly accredited representative.
2.2.2. Every application for approval shall be accompanied (see also paragraph 2.4.2.) by:
2.2.2.1. Drawings in triplicate, sufficiently detailed to permit identification of the type;
2.2.2.2. A technical description including ballast identification;
2.2.2.3. Three samples of each colour which has been applied for;
2.2.2.4. One sample of the ballast.
2.2.3. In the case of a type of gas-discharge light source differing only by the trade name or mark from a type that has already been approved, it shall be sufficient to submit:
2.2.3.1. A declaration by the manufacturer that the type submitted is (except in the trade name or mark) identical to and has been produced by the same manufacturer as the type already approved, the latter being identified by its approval code;
2.2.3.2. Two samples bearing the new trade name and mark.
2.2.4. The competent authority shall verify the existence of satisfactory arrangements for ensuring effective control of the conformity of production before type approval is granted.
2.3. Inscriptions
2.3.1. Gas-discharge light sources submitted for approval shall bear on the cap:
2.3.1.1. The trade name or mark of the applicant;
2.3.1.2. The international designation of the relevant category;
2.3.1.3. The rated wattage; this need not be indicated separately if it is part of the international designation of the relevant category;
2.3.1.4. A space of sufficient size to accommodate the approval mark.
2.3.2. The space mentioned in paragraph 2.3.1.4. shall be indicated in the drawings accompanying the application for approval.
2.3.3. Other inscriptions than those covered by paragraphs 2.3.1. and 2.4.4. may be affixed on the cap.
2.3.4. The ballast used for the type approval of the light source shall be marked with type and trade mark identification and with the rated voltage and wattage, as indicated on the relevant lamp data sheet.
2.4. Approval
2.4.1. If all samples of a type of gas-discharge light source which are submitted in accordance with paragraphs 2.2.2.3. or 2.2.3.2. comply with the requirements of this Regulation when tested with the ballast according to paragraph 2.2.2.4., approval shall be granted.
2.4.2. An approval code shall be assigned to each type approved. Its first character shall indicate the series of amendments incorporating the most recent major technical amendments made to the Regulation at the time of issue of the approval.
This will be followed by an identification code comprising not more than two characters. Only the Arabic numerals and capital letters listed in footnote shall be used.
The same Contracting Party may not assign the same code to another type of gas- discharge light source. If the applicant so desires the same approval code may be assigned to both the gas-discharge light sources emitting white and yellow light (see paragraph 2.1.2.3.).
2.4.3. Notice of approval or of extension, or refusal or withdrawal of approval or production definitely discontinued of a type of gas-discharge light source pursuant to this Regulation shall be communicated to the Parties of the Agreement which apply this Regulation by means of a form conforming to the model in annex 2 to this Regulation and of a drawing, supplied by the applicant, for approval, in a format not exceeding A4 (210 x 297mm) and on a scale of at least 2 : 1.
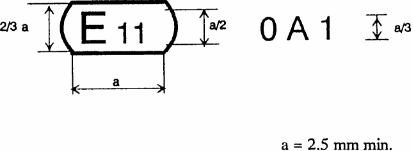
2.4.4. To every gas-discharge light source conforming to a type approved under this Regulation there shall be affixed in the space referred to in paragraph 2.3.1.4., in addition to the inscription required under paragraph 2.3.1., an international approval mark consisting of:
2.4.4.1. A truncated circle surrounding the letter 'E' followed by the distinguishing number of the country granting approval;
2.4.4.2. The approval code, placed close to the truncated circle.
2.4.5. If the applicant has obtained the same approval code for several trade names or marks, one or more of them will suffice to meet the requirements of paragraph 2.3.1.1.
2.4.6. The marks and inscriptions specified in paragraphs 2.3.1. and 2.4.3. shall be clearly legible and indelible.
2.4.7. Annex 3 to this Regulation gives an example of a type of approval mark.
3. TECHNICAL REQUIREMENTS
3.1. Definitions
3.1.1. "Gas-discharge light source": Light source in which the light is produced by a stabilized discharge arc.
3.1.2. "Ballast": Specific electrical supply for the gas-discharge light source.
3.1.3. "Rated voltage": Input voltage marked on the ballast.
3.1.4. "Rated wattage": Wattage marked on the gas-discharge light source and ballast.
3.1.5. "Test voltage": Voltage at the input terminals of the ballast for which the electrical and photometry characteristics of the gas-discharge light source are intended and are to be tested.
3.1.6. "Objective value": Design value of an electrical or photometry characteristic. To be achieved, within the specified tolerances, when the gas-discharge light source is energized by the ballast operated at the test voltage.
3.1.7. "Standard (etalon) gas-discharge light source": Special gas-discharge light source used for the testing of headlamps. It has reduced dimensional, electrical and photometric characteristics as specified on the relevant data sheet.
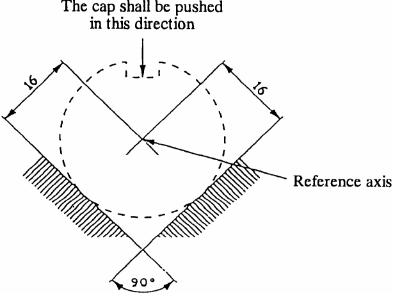
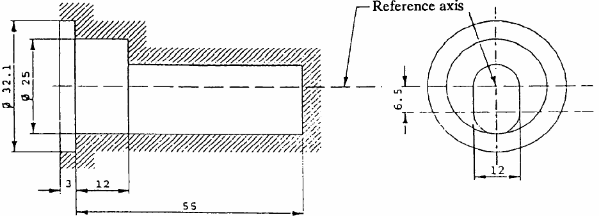
3.1.8. "Reference axis": An axis defined with reference to the cap and to which certain dimensions of the gas-discharge light source are referred.
3.1.9. "Reference plane": A plane defined with reference to the cap and to which certain dimensions of the gas-discharge light source are referred.
3.2. General specifications
3.2.1. Each sample submitted shall conform to the relevant specifications of this Regulation when tested with the ballast according to paragraph 2.2.2.4.
3.2.2. Gas-discharge light sources shall be so designed as to be and to remain in good working order when in normal use. They shall moreover exhibit no fault in design or manufacture.
3.3. Manufacture
3.3.1. The bulb of the gas-discharge light source shall exhibit no marks or spots which might impair their efficiency and their optical performance.
3.3.2. In the case of a coloured (outer) bulb, after an operating period of 15 hours with the ballast at test voltage, the surface of the bulb shall be lightly wiped with a cotton cloth soaked in a mixture of 70 volume % of n-heptane and 30 volume % of toluol. After five minutes, the surface shall be inspected visually. It shall not show any apparent changes.
3.3.3. Gas-discharge light sources shall be equipped with standard caps, complying with the cap data sheets of IEC Publication 61, third edition, as specified on the individual data sheets of annex 1.
3.3.4. The cap shall be strong and firmly secured to the bulb.
3.3.5. To ascertain whether gas-discharge light sources conform to the requirements of paragraphs 3.3.3. to 3.3.4., a visual inspection, a dimension check and, where appropriate, a trial fitting shall be carried out.
3.4. Tests
3.4.1. Gas-discharge light sources shall be aged as indicated in annex 4.
3.4.2. All samples shall be tested with the ballast, according to paragraph 2.2.2.4.
3.4.3. Electrical measurements shall be carried out with instruments of at least class 0.2. (0.2% full scale accuracy).
3.5. Position and dimensions of electrodes, arc and stripes
3.5.1. The geometric position of the electrodes shall be as specified on the relevant data sheet. An example of a method of measuring arc and electrodes position is given in annex 5. Other methods may be used.
3.5.1.1. The position and dimensions of the light source electrodes shall be measured before the ageing period, the gas-discharge light source unlit and using optical methods through the glass envelope.
3.5.2. The shape and the displacement of the arc shall conform to the requirements as given on the relevant data sheet.
3.5.2.1. The measurement shall be made after ageing with the light source supplied by the ballast at test voltage.
3.5.3. The position and dimension and transmission of the stripes shall comply with the requirements as given on the relevant data sheet.
3.5.3.1. The measurement shall be made after ageing with the light source supplied by the ballast at test voltage.
3.6. Starting, run-up and hot-restrike characteristics
3.6.1. Starting
When tested according to the conditions specified in annex 4, the gas-discharge light source shall start directly and remain alight.
3.6.2. Run-up
When measured according to the conditions specified in annex 4, the gas-discharge light source shall emit at least:
After 1 second : 25% of its objective luminous flux;
After 4 seconds: 80% of its objective luminous flux.
The objective luminous flux as indicated on the relevant data sheet.
3.6.3. Hot-restrike
When tested according to the conditions specified in annex 4, the gas-discharge light source shall restart directly after being switched-off for a period, as indicated on the data sheet. After one second the light source shall emit at least 80% of its objective luminous flux.
3.7. Electrical characteristics
When measured according to the conditions specified in annex 4, the voltage and wattage of the light source shall be within the limits given on the relevant data sheet.
3.8. Luminous flux
When measured according to the conditions specified in annex 4, the luminous flux shall be within the limits given on the relevant data sheet. In the case where white and yellow is specified for the same type, the objective value applied to light sources emitting white light, whereas the luminous flux of the light source emitting yellow light shall be at least 68% of the specified value.
3.9. Colour
3.9.1. The colour of the light emitted shall be white or yellow, as prescribed on the relevant data sheet.
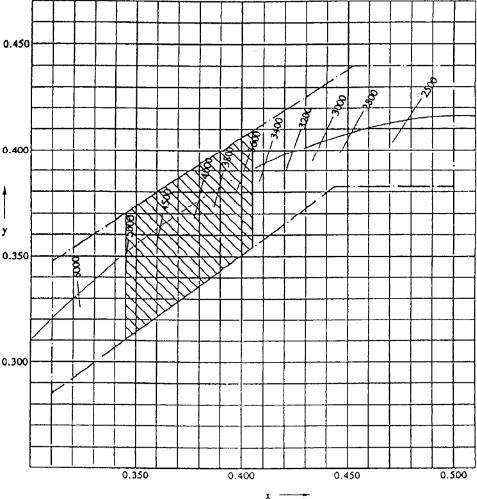
3.9.2. In case of white light, the calorimetric characteristics, expressed in CIE chromaticity coordinates, shall lie within the limits given on the relevant data sheet which are to be within the area formed by the following limits:
Towards blue....................................................... ......x > 0.310
Towards yellow...........................................................x < 0.500
Towards green..............................................................y < 0.150 + 0.640x
Towards green...............................................................y < 0.440
Towards purple.................................................. ............y > 0.050 + 0.750x
Towards red.....................................................................y > 0.382
3.9.3. In case of yellow light, the calorimetric characteristics shall lie within the area formed by the following limits:
Towards red...................................................................y > 0.138 + 0.580 x
Towards green................................................................y < 1.29 x - 0.100
Towards white................................................................y > -x + 0.940
and y > 0.440
Toward spectral value .....................................................y < -x + 0.992
3.9.4. The colour shall be measured according to the conditions specified in annex 4, paragraph 10.
3.9.5. The minimum red content of the light of a gas-discharge light source emitting white light shall be such that:

where:
Ee(lambda) [w] is the spectral distribution of the irradiance;
v(lambda) [l] is the spectral luminous efficiency;
(l) [nm] is the wave length.
This value shall be calculated using intervals of one nanometre.
3.10. UV-radiation
The UV-radiation of the gas-discharge light source shall be such that:

where:
s(l) [l] is the spectral weighting function;
km = 683 [lm/W] is the photometric radiation equivalent;
(For definitions of the other symbols see paragraph 3.9.5. above).
This value shall be calculated using intervals of one nanometre.
The UV - radiation shall be weighted according to the values as indicated in the following table:
lambda | s(lambda) |
250 | 0.430 |
255 | 0.520 |
260 | 0.650 |
265 | 0.810 |
270 | 1.000 |
275 | 0.960 |
280 | 0.880 |
285 | 0.770 |
290 | 0.640 |
295 | 0.540 |
300 | 0.300 |
305 | 0.060 |
310 | 0.015 |
315 | 0.003 |
320 | 0.001 |
325 | 0.00050 |
330 | 0.00041 |
335 | 0.00034 |
340 | 0.00028 |
345 | 0.00024 |
350 | 0.00020 |
355 | 0.00016 |
360 | 0.00013 |
365 | 0.00011 |
370 | 0.00009 |
375 | 0.000077 |
380 | 0.000064 |
385 | 0.000053 |
390 | 0.000044 |
395 | 0.000036 |
400 | 0.000030 |
Wavelengths chosen are representative; other values should be interpolated. Values according to "IRPA/INIRC Guidelines on limits of exposure to ultraviolet radiation".
3.11. Standard gas-discharge light sources
Standard (etalon) gas-discharge light sources shall comply requirements applicable to type approval light sources and to the specific requirements as stated in the relevant data sheet.
In the case of a type emitting white and yellow light the standard light source shall emit white light.
4. CONFORMITY OF PRODUCTION
4.1. Gas-discharge light sources approved to this Regulation shall be so manufactured as to conform to the type approved by meeting the inscriptions and technical requirements set forth in paragraph 3 above and annexes 1 and 3 to this Regulation.
4.2. In order to verify that the requirements of paragraph 4.1. are met, suitable controls of the production shall be carried out.
4.3. The holder of the approval shall in particular:
4.3.1. ensure existence of procedures for the effective control of the quality of products,
4.3.2. have access to the control equipment necessary for checking the conformity to each approved type,
4.3.3. ensure that data of test results are recorded and that related documents shall remain available for a period to be determined in accordance with the administrative service,
4.3.4. analyse the results of each type of test, applying criteria of annex 7, in order to verify and ensure the stability of the product characteristics making allowance for variation of an industrial production,
4.3.5. ensure that for each type of gas-discharge light source, at least the tests prescribed in annex 6 to this Regulation are carried out,
4.3.6. ensure that any collecting of samples giving evidence of non-conformity with the type of test considered shall give rise to another sampling and another test. All the necessary steps shall be taken to re-establish the conformity of the corresponding production.
4.4. The competent authority which has granted type-approval may at any time verify the conformity control methods applicable to each production unit.
4.4.1. In every inspection, the test books and production survey records shall be presented to the visiting inspector.
4.4.2. The inspector may take samples at random which will be tested in the manufacturer's laboratory. The minimum number of samples may be determined according to the results of the manufacturer's own verification.
4.4.3. When the quality level appears unsatisfactory or when it seems necessary to verify the validity of the tests carried out in application of paragraph 4.4.2. above, the inspector shall select samples, to be sent to the technical service which has conducted the type approval tests.
4.4.4. The competent authority may carry out any tests prescribed in this Regulation. These tests will be on samples selected at random without causing distortion of the manufacturer's delivery commitments and in accordance with the criteria of annex 8.
4.4.5. The competent authority shall strive to obtain a frequency of inspection of once every two years. However, this is at the discretion of the competent authority and their confidence in the arrangements for ensuring effective control of the conformity of production. In the case where negative results are recorded, the competent authority shall ensure that all necessary steps are taken to re-establish the conformity of production as rapidly as possible.
5. PENALTIES FOR NON-CONFORMITY OF PRODUCTION
5.1. The approval granted in respect of a gas-discharge light source pursuant to this Regulation may be withdrawn if the prescribed conformity of production requirements are not met.
5.2. If a Contracting Party to the Agreement applying this Regulation withdraws an approval previously granted, it shall forthwith so notify the other Contracting Parties applying this Regulation, by means of the communication form conforming to the model in annex 2 to this Regulation.
6. PRODUCTION DEFINITELY DISCONTINUED
If the holder of the approval completely ceases to manufacture a gas-discharge light source type approved in accordance with this Regulation, he shall so inform the authority which had granted the approval. Upon receiving the relevant communication, that authority shall inform thereof the other Parties to the Agreement applying this Regulation by means of the communication form conforming to the model in annex 2 to this Regulation.
7. NAMES AND ADDRESSES OF THE TECHNICAL SERVICES RESPONSIBLE FOR CONDUCTING APPROVAL TESTS, AND OF ADMINISTRATIVE DEPARTMENTS
The Parties to the Agreement which apply this Regulation shall communicate to the Secretariat of the United Nations the names and addresses of the technical services responsible for conducting approval tests and of the administrative departments which grant approval and to which forms certifying approval or extension or refusal or withdrawal of approval, or production definitely discontinued, issued in other countries, are to be sent.
Annex 1
Categories D1S and D2S Sheet DlS/D2S/1
The drawings are intended only indicate the essential dimensions of the gas-discharge light source
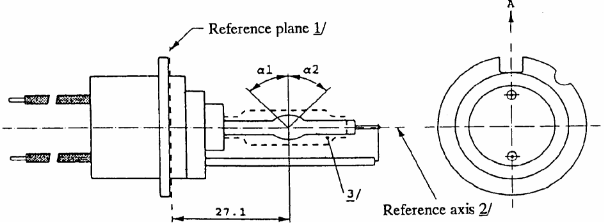
Figure 1 Category D1S Type with cables Cap PK 32d-2

Figure 2 Category D2S Type with connector Cap P 32d-2

1/ The reference plane is defined by the position on the surface of the holder on which the three supporting bosses of the cap ring will rest.
2/ See sheet D1S/D2S/2.
3/ When measured at a distance of 27.1mm from the reference plane and with respect to the mid-point of the inner bulb, the outer bulb shall have an eccentricity of 1mm max.
DlS and D2S Sheet DlS/D2S/2
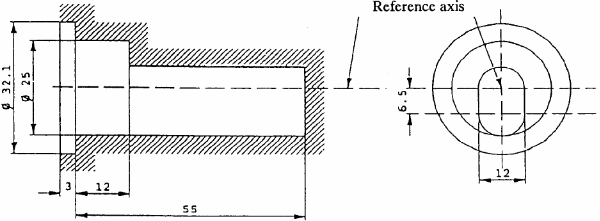
Figure 3 Definition of reference axis

Figure 4 Maximum lamp outline

The reference axis is perpendicular to the reference plane and crosses the intersection of the two parallel lines as indicated in figure 3.
2/ Glass bulb and supports shall not exceed the envelope, as indicated in figure 4. The envelope is concentric with the reference axis.
Categories D1S and D2S Sheet DlS/D2S/3
Dimensions | Production light sources | Standard light sources |
Position of the electrodes | Sheet D1S/D2S/4 |
Position and form of the arc | Sheet D1S/D2S/5 |
alpha1, alpha2 | 55 degrees min. | 55 degrees min. |
Category D1S: cap PK 32d-2 in accordance with IEC 61-1 (sheet 7004-111-1) Category D2S: cap P 32d-2 in accordance with IEC 61-1 (sheet 7004-111-1) |
ELECTRIC AND PHOTOMETRIC CHARACTERISTICS |
Rated voltage of the ballast | V | 12 | 12 |
Rated wattage | W | 35 | 35 |
Test voltage | V | 13.5 | 13.5 |
Lamp voltage | Objective | V | 85 | 85 |
Tolerance | +/- 17 | +/- 8 |
Lamp wattage | Objective | W | 35 | 35 |
Tolerance | +/- 3 | +/- 0.5 |
Luminous flux | Objective | lm | 3,200 | 3,200 |
Tolerance | +/- 450 | +/- 150 |
Colour co-ordinates | Objective | | x = 0.375 y = 0.375 |
Tolerance area | x > 0.345 y < 0.150 + 0.640 x x < 0.405 y > 0.050 + 0.750 x |
Hot restrike switch-off time | | 10 | 10 |
Categories DlS and D2S Sheet DlS/D2S/4


Categories DlS and D2S Sheet DlS/D2S/5
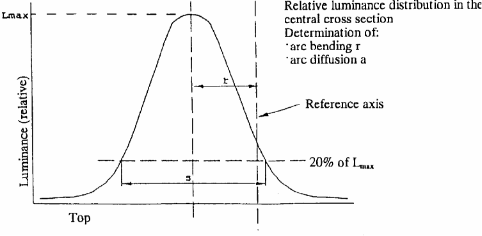
This test is used to determine the form of the arc and its position relative to the reference axis and plane by measuring its bending and diffusion in the cross section at a distance 27.1mm from the reference plane.
The form of the arc is for illustration purposes only.

When measuring the relative luminance distribution in the central cross section as indicated in the drawing above, the maximum value shall be located within a distance r from the reference axis. The points of 20% of the maximum value shall be within s.
Dimension in mm | Production light sources | Standard light sources |
r | 0.50 +/- 0.40 | 0.50 +/- 0.20 |
s | 1.10 +/- 0.40 | 1.10 +/- 0.25 |

Categories D1R and D2R Sheet D1R/D2R/1
The drawings are intended only to indicate the essential dimensions of the gas-discharge light source
Figure 1 Category D1R Type with cables Cap PK 32d-3

Category D2R Type with connector Cap P 32d-3

1/ The reference plane is defined by the positions on the surface of the holder on which the three supporting bosses of the cap ring will rest.
2/ See sheet D1R/D2R/2.
3/ With respect to the reference axis, when measured at a distance of 27.1mm from the reference plane the eccentricity of the outer bulb shall be less than +/- 0.5mm in direction B and less than + 1mm - 0.5mm in direction A.
Categories D1R and D2R Sheet D1R/D2R/2
Figure 3 Definition of reference axis

Figure 4 Maximum lamp outline

Categories D1R and D2R Sheet D1R/D2R/3
Dimensions | Production light sources | Standard light sources |
Position of the electrodes | Sheet D1R/D2R/4 |
Position and form of the arc | Sheet D1R/D2R/5 |
Position of the black stripes | Sheet D1R/D2R/6 |
alpha1 1/ | 45 degrees +/- 5 degrees |
alpha2 | 45 degrees min |
Category D1R: cap PK32d-3 in accordance with IEC 61-1 (sheet 7004-111-1) Category D2R: cap P32d-3 in accordance with IEC 61-1 (sheet 7004-111-1) |
ELECTRIC AND PHOTOMETRIC CHARACTERISTICS |
Rated voltage of the ballast | V | 12 | 12 |
Rated wattage | W | 35 | 35 |
Test voltage | V | 13.5 | 13.5 |
Lamp voltage | Objective | V | 85 | 85 |
Tolerance | +/- 17 | +/- 8 |
Lamp wattage | Objective | W | 35 | 35 |
Tolerance | +/- 3 | +/- 0.5 |
Luminous flux | Objective | lm | 2800 | 2800 |
Tolerance | +/- 450 | +/- 150 |
Colour co-ordinates | Objective | | x = 0.375 y = 0.375 |
Tolerance area | x > 0.345 y < 0.150 + 0.640 x x < 0.405 y > 0.050 + 0.750 x |
Hot restrike switch-off time | | 10 | 10 |
Categories D1R and D2R Sheet D1R/D2R/4
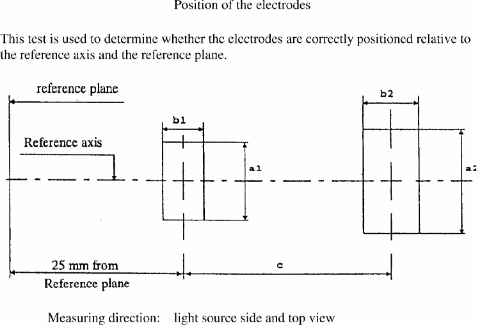
Position of electrodes
This test is used to determine whether the electrodes are correctly positioned relative to the reference axis and the reference plane.

Measuring direction A and B as defined on sheet D1R/D2R/1
Dimension in mm | Production light sources | Standard light sources |
a1 | d + 0.5 | d + 0.2 |
a2 | d + 0.7 | d + 0.35 |
b1 | 0.4 | 0.15 |
b2 | 0.8 | 0.3 |
c | 4.2 | 4.2 |
d = diameter of the electrode < 0.3
The top of the electrode nearest to the reference plane shall be positioned in the area defined by a1 and b1. The top of the electrode furthest from the reference plane shall be positioned in the area defined by a2 and b2.
Categories D1R and D2R Sheet D1R/D2R/5
Position and form of the arc
This test is used to determine the form and sharpness of the arc and its position relative to the reference axis and plane by measuring its bending and diffusion in the central cross section D and by measuring stray light intensities in zone A and at lines B and C.

When measuring the relative luminance distribution in the central cross section D as indicated in the drawing above, the maximum value Lmax has the distance r from the reference axis. The points of 20% of Lmax have the distance s, as shown in the drawing below.
Dimension in mm | Production light sources | Standard light sources |
r | 0.50 +/- 0.25 | 0.50 +/- 0.20 |
s | 1.10 +/- 0.25 | 1.10 +/- 0.25 |

When measuring the luminances from measuring direction B as defined on sheet D1R/D2R/6 with a set-up as outlined in Annex 5, however with a circular field of 0.2Mmm diameter, the relative luminance expressed as a percentage of Lmax (at cross section D) shall be:
Zone A <4.5 %
Line B <15 %
Line C <5.0 %
The area of zone A is defined by the black coating, the outer bulb and a plane at 24.5mm from the reference plane.
Categories D1R and D2R Sheet D1R/D2R/6
Position of the black stripes
This test is used to determine whether the black stripes are correctly positioned relative to the reference axis and the reference plane.

When measuring the luminance distribution of the arc in the central cross section as defined on sheet D1R/ D2R/5, after having turned the light source so that the black stripe is covering the arc, the measured luminance shall be < 0.5% of Lmax.
In the area defined by alpha1 and alpha3 the black coating may be replaced by any other means which prevents light transmission through the specified area.
Dimensions | Production light sources | Standard light sources |
alpha1 | 45 degrees +/- 5 degrees |
alpha3 | 70 degrees min |
alpha4 | 65 degrees min |
beta1/24, beta1/30, beta2/24, beta2/30 | 25 degrees +/- 5 degrees |
f1/24, f2/24 | 0.15 +/- 0.25 | 0.15 +/- 0.2 |
f1/30 1/ | f1/24mv +/- 0.15 | f1/24mv +/- 0.1 |
f2/30 1/ | f2/24mv +/- 0.15 2/ | f2/24mv +/- 0.1 |
f1/24mv - f2/24mv | +/- 0.3 max | +/- 0.2 max |
d | 9 +/- 1 |


